Showing posts with label positions. Show all posts

Friday, May 31, 2013

How to Read Guitar Tabs


Hello again! Still busy memorizing Jesu. I'm slightly addicted. By day three I expected to go stark mad over the repetitions. I didn't expect that the more I played this one, the more I'd learn to love it. Now here I am, head over heels - or rather, finger-tied. At some point a day ago, I had to quit because of a lingering pain above the wrist. I think it was because of the pressure I placed on the pinky whenever I played Romance/Jeux.


Today the pain is slight, but it's still there. Rest rest, but I can't because Jesu sound just so right :)

***end of introduction

SO! This post is about how to read guitar tabs. This comes as a reply to a friend who mentioned that tabs looked complicated. In all fairness, I felt the same way. I still remember how I read a barre chord erroneously, thinking it was impossible to press all 6 strings at once. I thought the barre itself went something like, choose one of the 6 strings. But no! All strings in a barre must be pressed... the biggest shock of my life! I almost wanted to stop playing then. I actually hate barring because it's painful and tiresome to play. Nakakangawit. But it can't be helped. Two of the major chords are played with a barre (F and B). Power chords are in barre (except if the shortcuts are used).

Before starting with chords, here are a few guidelines.

Names of the strings. Yes, they have names. The thickest, the one closest to the player's face when the guitar is at playing position, is called the 6th string. The thinnest is the 1st string. So from the player's point of view, from thickest to thinnest, the string names are: 6th, 5th, 4th, 3rd, 2nd and 1st. Not bad, huh?

Guitar Standard Tuning. The standard notes of each string follows thus:  E-A-D-G-B-e. In the absence of an electronic tuner, guitarists can tune the strings by ear (or oido, a music savant who can identify tones by ear), using this nifty site.
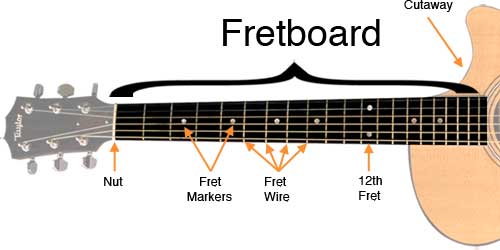
taken from http://www.start-playing-guitar.com/

Fret. The parallel lines on the fingerboard that are perpendicular to the strings. When a number precedes the word "fret," this means a particular spot between frets. Markers on the fingerboard help guitarists pick out higher frets with a glance. These are placed in the 3rd, 5th, 7th, 9th and 12th frets.

Left hand finger names. Yes, they have names too! Unfortunately! They are also designated by numbers! They are 1: pointer, 2: middle, 3: ring and 4: pinky.

Open strings. Strings that are played without pressing on the strings. Denoted by the symbol 0 (zero).

Palm mute. Strings that are played muted or not played at all. Denoted by the symbol X.

Reading Guitar Tabs

Let's take the major chord C. This is how it looks like in real life:

Front view. Taken from http://www.guitar-beginner.com/

Guitarist's point of view. Taken from http://www.1stpersonguitar.com
Notice where the fingers go. There are three things to take note: the string pressed, the fret where the string is pressed, and the finger that does the pressing. For C chord, the strings are 5th, 4th and 2nd. The frets are 3, 2 and 1 respective of the strings. The fingers used are 3, 2 and 1 respective of the strings.

Chords are notated in different ways. We'll examine three of the most common types for this exercise.

One of these is the horizontal notation*, like so:

taken from http://www.pengustudios.com
This is the easiest to read. This follows the guitarist's point of view, the bottom horizontal line designated by uppercase E being the 6th string and the top horizontal line designated by lowercase e being the 1st string -- remember standard tuning? The leftmost line is the nut (the thickest fret, the leftmost in the fingerboard) and the succeeding vertical lines are the frets. The black spots indicate the points that are to be pressed, and the numbers on the mare the fingers to be used. X means that the 6th string should not be played.

The next notation is vertical*, like so:

taken from http://www.cyberfret.com
This one's pretty similar to the previous, except it doesn't follow the guitarist's point of view and the grid lines have been reversed (horizontal lines = frets, vertical lines = strings). Instead of the finger numbers placed inside the black spots, they're placed along the vertical lines. 0 means that these strings are played without pressing the strings, as indicated by the absence of black marks on the respective lines.

Horizontal and vertical notations are used in chord books and playing guides. The following two are called the linear notation*, the root of all complications. These two are favorites among Ultimate-Guitar users, so there's no escaping learning them.

The first one looks like a phone number to some lonely telephone booth. The other looks like a code for some confidential military report. Granted, they don't give as much information as the first two notations, but they're faster to read once the guitarist has mastered the basics.


This notation looks a lot like the vertical notation, doesn't it? Actually, the numbers designate which frets to press, not which fingers to press with. The numbers are also arranged from 6th to 1st string, so that we have 6th string = X, 5th string = 3, 4th string = 2, and so on. For F, the notation would be: 133211, reading 6th = 1st fret, 5th = 3rd fret, 4th = 3rd fret, and so on. Which fingers to press with? That's up to you! Finger names are not indicated, which makes this notation a kind of a level above the first two notations.


This following is causing hyperventilation among newbie users of Ultimate-Guitar, but this is actually highly entertaining to read. This reads like the horizontal notation, except that the numbers designate the frets that must be pressed. Numbers that appear in a single column should be played together. In the notation above, 3 and 0, 2 and 1, and 3 and 3 must be played together, like so:

This notation is played from left to right. The notation above is played so:

3&0 (at the same time) - 0 - 2 - 0 - 2&1 - 0 - 2 - 0 - 3&3. This is Fernando Sor's Study in C (35, 13). This particular part is from 0:06-0:08 of this video. Like the other notations in this post, it's also based on the chord C - see how it uses almost the same fingering as the others, except the notation is fingerstyle.

Questions?

* The terms used here are mine, for ease of narration :)
* Horizontal and vertical notations, referring to the fingerboard position respective to the ground.

Thursday, May 23, 2013

Left Wrist Says Ouchies Again!

I tried to play Jeux Interdits part 2, forgetting to warm up beforehand. What did I get? Minutes' worth of ouchies!

A few pointers on correct left hand position -- correct being not just a matter of following strictly formalist classical playing; rather, a matter of warning to those who do not wish any unpleasant, painful sensations while playing.

Take a close look at the thumb position. The thumb should never - evah! - cross the palm, or else pressure when pressing the fingerboard will fall on the median nerve, a primary ingredient for wrist pain. Instead, do:


... pull your thumb out and away from the palm. Playing this way will also force your fingers to lean towards the left, making bars easier for both index and middle fingers.


PS. My MS Paint skills are once again put to the test!

Tuesday, February 12, 2013

Coffee Break

This exercise isn't exactly what I'd call a coffee break. It's tedious, frustrating, and difficult to master. But once I did... waaaah I couldn't stop playing it! The melody is very chill, relaxed. Perfect for practice and leisure time.


Ok, ok. I know it's corny. Even I could only take so much cheesiness in song lyrics (don't even get me started with this song's official music video! ugh!). But the tabs are crazy! Tabs for Landon Pigg's Falling in Love at a Coffee Shop can be found here.

The most difficult part about the tabs to this song is the heavy bass line. It's like a metronome, so the melody is played together with the bass. If you can switch your thumb to on during the whole song that would super help. The PIMA can be practiced too, so try to stick with it. Use number 4 (pinkie, left hand) to reach the 4th and 5th frets to practice stretching.


Ok, tips:
1. Break it down. Play the melody (the 4th-6th string notes) as is first, put it to heart. Afterwards, play the bass notes (1st string notes) and get the timing right.
2. Slow down!
3. Listen to the song and pay close attention to the timing, especially the bass notes. It's easy to get lost in all the confusion (misplaced thumb, uncooperative fingers!).
4. Don't mind the lyrics. Seriously, sing after mastering the chords.


Right now I'm having difficulty playing the refrain

|-------------------------4-----------4----------------------------------------------------------|
|-2-----------2-----------------------------------4-----------4-----------5-----------5----------|
|-------2-----------2-----------2-----------2-----------2-----------2-----------2-----------2----|
|------------------------------------------------------------------------------------------------|
|-0--0-----0--0--0-----0--0--0-----0--0--0-----0--0--0-----0--0--0-----0--0--0-----0--0--0-----0-|
|------------------------------------------------------------------------------------------------|

because of the bass line switch from the 1st string to the 2nd string. I dunno. I think it's just my thumb. I tend to hit the other strings when I make the switch. Wild thumb playing.


Chords:
If you like this song, but find that you just can't master this notation right now, here's some sort of good news: I've set up a very easy tab over at Ultimate Guitar. I assure you, it's better than the rest of the versions available in the site. Enjoy!


PS: This! I couldn't find the tabs for melody during the chorus (for now). I dislike playing the power chords. It ruins the mood, haha!

Monday, February 11, 2013

The Big G

The first classical guitar piece I learned was Minuet in G by Johann Sebastian Bach.

The sheet I used covered the basic melody of the piece, sans the bass notes (rhythm). I worked from the 5th fret onward. Very easy to memorize and great for practice: the notes span up to 5 frets, so the pinkie and all the left fingers are stretched. All six strings are also covered, so the PIMA right hand can be practiced.

Minuet in G is my stretching slash warm-up piece. I play it every day, every time I pick up my guitar. I like speeding it up for better flexibility and accuracy. I used to play it non-stop, and until now I haven't tired of listening to it.

I moved on to the more complicated melody + rhythm version about a month after burning the first version. I immediately fell in love with the sound of the bass notes along with the melody. This version takes up til the 9th fret, so I can practice moving through the fingerboard. The addition of the bass notes complicates the left hand positions, but they're manageable. The sheet I linked does not have a notation for 1234 and PAMI (except the 0s there), but I use all of them... figure it out :)

My crux is always on the 19th bar. My index finger tends to look sooo out of place and awkwardly apart, and the rest of my fingers (2 and 4 especially) go crazy when I press the strings. I tend to slow down at this portion. I can swing it when I position my left hand closer to the fingerboard, but that index just shoots up sometimes I couldn't control it! Oh well, time and practice.

This piece was also my (re)introduction to sheet reading. The two sheets don't have tabs, so I was really forced to read notes. Both versions are very basic though.

I eat Big G for breakfast, lunch, merienda and dinner. Lemme know how this piece figures in your repertoire. If you use other warm-up pieces, feel free to share.


Mar 11, 2013. Just uploaded this video. Sorry for the poor audio -- I didn't use a mic when I recorded. Didn't have one. Anyway, my messy fingering clearly says this rendition sucks. As usual, I had a difficult time through the crux. My left hand fingers are also still awkwardly apart. Wild vibrato action there too. Hmmm, when in doubt record your practice sessions. Any specific pointers on improvement?

Friday, February 8, 2013

Plucking Hand Position

I just realized this week that my plucking hand (right) position may be wrong. May be because although classical teaching has set rules for proper playing positions (body, feet, arms and hands) I also understand that guitarists can wield their guitars freely. Music playing is free!

But the consequences of wrong positions will deter effective and safe playing. Quality also dies.

This is why I want to share a video that can help you position your plucking hand.


Again, it is not crucial to follow every bit of detail. Guitarists, musicians in general, should play in whatever way they want.

Right now, I'm struggling with right hand positioning over left hand positioning. The first time I picked up classical I played with a splayed right hand:

Okaaaay, my fingers don't look that... evil in the splayed position :) But the idea is that the fingers are separate and open. With the splayed position, I played solely with my fingertips. I was able to reach the last 3 strings (G-B-E, or the 4th, 5th, and 6th) easily. The sound was, well... metallic (yes, it's possible to produce a metallic sound with nylon strings) and stringy. But I found it was adequate at the beginning. Now, I tried playing with a closed fist like so:
and Yes! Try difference is superb! I was skeptic about fingernail playing at first. But the closed fist position made me believe that it is possible to produce a better sound. With a closed fist, both fingertips and nails hit the strings, producing a warmer sound. The closed fist made it harder to reach the 4th-6th strings, but I think I'll get it with practice.

Now I practice in front of the mirror. My plucking hand still reverts to splayed position, but I'm doing my best to keep my fingers close together. Just like a demure little girl.

* I invented the terms splayed position and closed fist position for clarification purposes. They're not technical terms, but you're welcome to use them :)
** HAHA the drawings! I couldn't find an image that quite captured the look of the splayed position, so I drew one :) And then I went ahead and drew the closed fist just cause I felt like a winner!