Showing posts with label chords. Show all posts

Friday, May 31, 2013

How to Read Guitar Tabs


Hello again! Still busy memorizing Jesu. I'm slightly addicted. By day three I expected to go stark mad over the repetitions. I didn't expect that the more I played this one, the more I'd learn to love it. Now here I am, head over heels - or rather, finger-tied. At some point a day ago, I had to quit because of a lingering pain above the wrist. I think it was because of the pressure I placed on the pinky whenever I played Romance/Jeux.


Today the pain is slight, but it's still there. Rest rest, but I can't because Jesu sound just so right :)

***end of introduction

SO! This post is about how to read guitar tabs. This comes as a reply to a friend who mentioned that tabs looked complicated. In all fairness, I felt the same way. I still remember how I read a barre chord erroneously, thinking it was impossible to press all 6 strings at once. I thought the barre itself went something like, choose one of the 6 strings. But no! All strings in a barre must be pressed... the biggest shock of my life! I almost wanted to stop playing then. I actually hate barring because it's painful and tiresome to play. Nakakangawit. But it can't be helped. Two of the major chords are played with a barre (F and B). Power chords are in barre (except if the shortcuts are used).

Before starting with chords, here are a few guidelines.

Names of the strings. Yes, they have names. The thickest, the one closest to the player's face when the guitar is at playing position, is called the 6th string. The thinnest is the 1st string. So from the player's point of view, from thickest to thinnest, the string names are: 6th, 5th, 4th, 3rd, 2nd and 1st. Not bad, huh?

Guitar Standard Tuning. The standard notes of each string follows thus:  E-A-D-G-B-e. In the absence of an electronic tuner, guitarists can tune the strings by ear (or oido, a music savant who can identify tones by ear), using this nifty site.
taken from http://www.start-playing-guitar.com/

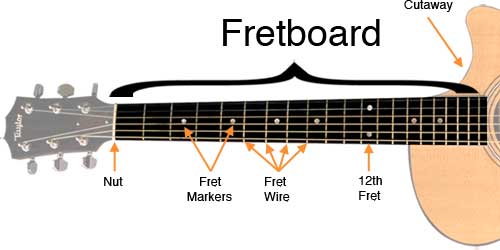
Fret. The parallel lines on the fingerboard that are perpendicular to the strings. When a number precedes the word "fret," this means a particular spot between frets. Markers on the fingerboard help guitarists pick out higher frets with a glance. These are placed in the 3rd, 5th, 7th, 9th and 12th frets.

Left hand finger names. Yes, they have names too! Unfortunately! They are also designated by numbers! They are 1: pointer, 2: middle, 3: ring and 4: pinky.

Open strings. Strings that are played without pressing on the strings. Denoted by the symbol 0 (zero).

Palm mute. Strings that are played muted or not played at all. Denoted by the symbol X.

Reading Guitar Tabs

Let's take the major chord C. This is how it looks like in real life:

Front view. Taken from http://www.guitar-beginner.com/

Guitarist's point of view. Taken from http://www.1stpersonguitar.com
Notice where the fingers go. There are three things to take note: the string pressed, the fret where the string is pressed, and the finger that does the pressing. For C chord, the strings are 5th, 4th and 2nd. The frets are 3, 2 and 1 respective of the strings. The fingers used are 3, 2 and 1 respective of the strings.

Chords are notated in different ways. We'll examine three of the most common types for this exercise.

One of these is the horizontal notation*, like so:

taken from http://www.pengustudios.com
This is the easiest to read. This follows the guitarist's point of view, the bottom horizontal line designated by uppercase E being the 6th string and the top horizontal line designated by lowercase e being the 1st string -- remember standard tuning? The leftmost line is the nut (the thickest fret, the leftmost in the fingerboard) and the succeeding vertical lines are the frets. The black spots indicate the points that are to be pressed, and the numbers on the mare the fingers to be used. X means that the 6th string should not be played.

The next notation is vertical*, like so:

taken from http://www.cyberfret.com
This one's pretty similar to the previous, except it doesn't follow the guitarist's point of view and the grid lines have been reversed (horizontal lines = frets, vertical lines = strings). Instead of the finger numbers placed inside the black spots, they're placed along the vertical lines. 0 means that these strings are played without pressing the strings, as indicated by the absence of black marks on the respective lines.

Horizontal and vertical notations are used in chord books and playing guides. The following two are called the linear notation*, the root of all complications. These two are favorites among Ultimate-Guitar users, so there's no escaping learning them.

The first one looks like a phone number to some lonely telephone booth. The other looks like a code for some confidential military report. Granted, they don't give as much information as the first two notations, but they're faster to read once the guitarist has mastered the basics.


This notation looks a lot like the vertical notation, doesn't it? Actually, the numbers designate which frets to press, not which fingers to press with. The numbers are also arranged from 6th to 1st string, so that we have 6th string = X, 5th string = 3, 4th string = 2, and so on. For F, the notation would be: 133211, reading 6th = 1st fret, 5th = 3rd fret, 4th = 3rd fret, and so on. Which fingers to press with? That's up to you! Finger names are not indicated, which makes this notation a kind of a level above the first two notations.


This following is causing hyperventilation among newbie users of Ultimate-Guitar, but this is actually highly entertaining to read. This reads like the horizontal notation, except that the numbers designate the frets that must be pressed. Numbers that appear in a single column should be played together. In the notation above, 3 and 0, 2 and 1, and 3 and 3 must be played together, like so:

This notation is played from left to right. The notation above is played so:

3&0 (at the same time) - 0 - 2 - 0 - 2&1 - 0 - 2 - 0 - 3&3. This is Fernando Sor's Study in C (35, 13). This particular part is from 0:06-0:08 of this video. Like the other notations in this post, it's also based on the chord C - see how it uses almost the same fingering as the others, except the notation is fingerstyle.

Questions?

* The terms used here are mine, for ease of narration :)
* Horizontal and vertical notations, referring to the fingerboard position respective to the ground.

Monday, April 15, 2013

Uke Night

I and a friend attended one of Ukulele Manila's Meet, Strum & Jam sessions (free admission, free short lessons) and was able to play the uke for the first time. It's just soooo cute! And the soprano was smaller than I thought at first.  It felt weird to hold and play it 'cause it was so cute and small :) And my left thumb tired easily 'cause unlike the guitar, I could't rest my palm on the fretboard. Anyway, I tried playing a Susing's, and it was amaaaazing! I didn't really find that a (Sta. Mesa) Lumanog guitar sounded great (though I'd never trade my Lazaro for anything in the world!). Which made me prematurely conclude that all Philippine-guitars are meeh. But after I tried a Susing's uke, I thought whoooooooa!


I've read about Susing's in the past. It's a very famous guitar shop and maker in Cebu (Cebu, you're officially in my bucketlist of places to visit!). Anyway, I've been wanting to buy a pineapple uke, but I played a standard uke during the MSJ (standard meaning the sexy, curvaceous guitar sounding board). I realized the merits of the curvaceous uke when playing standing up: the curves act as anchors across the pelvic area, so I was able to hold the uke steadily even without a sling on.

Uke major chords are weird, especially the ones that need to be barred. Like E (4442) and D (2220). Instead of barring E on the fourth fret, I used three fingers to press the strings. I should warn those with.... er, slightly big fingers: get a concert or the bigger ukes.

If you're interested to buy a uke, visit Ukulele Manila's page. As for me, I'm saving up for a Susing's, which a UM member said would soon be available in their stocks.

Monday, April 1, 2013

Making Progress III: Flamenco x3 x6

Progress, definitely! Re: flamenco triplet, day 6. I can play successive strokes without feeling any pain on my right hand. Switching down and up strokes isn't so weird now too. The trick: minimize excess movements and to keep the thumb out. I don't get trapped in between strings anymore too. Gaaah I wish I could just record it. I wish I recorded the whole thing. The day before yesterday was breakthrough day because it was the first time I made successive strokes without errors. I think it was also the day when my right hand mid and ring finger finally got the rhythm. Right now, I'm just trying to develop consistency and endurance.

Aaaand switching chords (following the Spanish-y progression E-F-G-Am) with my left hand. Since starting I've used my left hand as an anchor, mostly muffling by the strings. The triplet is crazy, and with a guitar the size of mine its really difficult to stabilize the craziness. But once my forearm became more settled and steady (which happened around breakthrough day, too), I found it easier to switch chords.

Once I get the hang of the x3, I'll try other stroke progressions: vv (downMidRing-downThumb)  and v^ (downT-upT). Then more complicated patterns: vv^ vv^ v^ (x3-x3-downTupT). Then off to accents, then percussive effects, then THE WORLD!

Omigash so excited!

Tuesday, February 12, 2013

Coffee Break

This exercise isn't exactly what I'd call a coffee break. It's tedious, frustrating, and difficult to master. But once I did... waaaah I couldn't stop playing it! The melody is very chill, relaxed. Perfect for practice and leisure time.


Ok, ok. I know it's corny. Even I could only take so much cheesiness in song lyrics (don't even get me started with this song's official music video! ugh!). But the tabs are crazy! Tabs for Landon Pigg's Falling in Love at a Coffee Shop can be found here.

The most difficult part about the tabs to this song is the heavy bass line. It's like a metronome, so the melody is played together with the bass. If you can switch your thumb to on during the whole song that would super help. The PIMA can be practiced too, so try to stick with it. Use number 4 (pinkie, left hand) to reach the 4th and 5th frets to practice stretching.


Ok, tips:
1. Break it down. Play the melody (the 4th-6th string notes) as is first, put it to heart. Afterwards, play the bass notes (1st string notes) and get the timing right.
2. Slow down!
3. Listen to the song and pay close attention to the timing, especially the bass notes. It's easy to get lost in all the confusion (misplaced thumb, uncooperative fingers!).
4. Don't mind the lyrics. Seriously, sing after mastering the chords.


Right now I'm having difficulty playing the refrain

|-------------------------4-----------4----------------------------------------------------------|
|-2-----------2-----------------------------------4-----------4-----------5-----------5----------|
|-------2-----------2-----------2-----------2-----------2-----------2-----------2-----------2----|
|------------------------------------------------------------------------------------------------|
|-0--0-----0--0--0-----0--0--0-----0--0--0-----0--0--0-----0--0--0-----0--0--0-----0--0--0-----0-|
|------------------------------------------------------------------------------------------------|

because of the bass line switch from the 1st string to the 2nd string. I dunno. I think it's just my thumb. I tend to hit the other strings when I make the switch. Wild thumb playing.


Chords:
If you like this song, but find that you just can't master this notation right now, here's some sort of good news: I've set up a very easy tab over at Ultimate Guitar. I assure you, it's better than the rest of the versions available in the site. Enjoy!


PS: This! I couldn't find the tabs for melody during the chorus (for now). I dislike playing the power chords. It ruins the mood, haha!